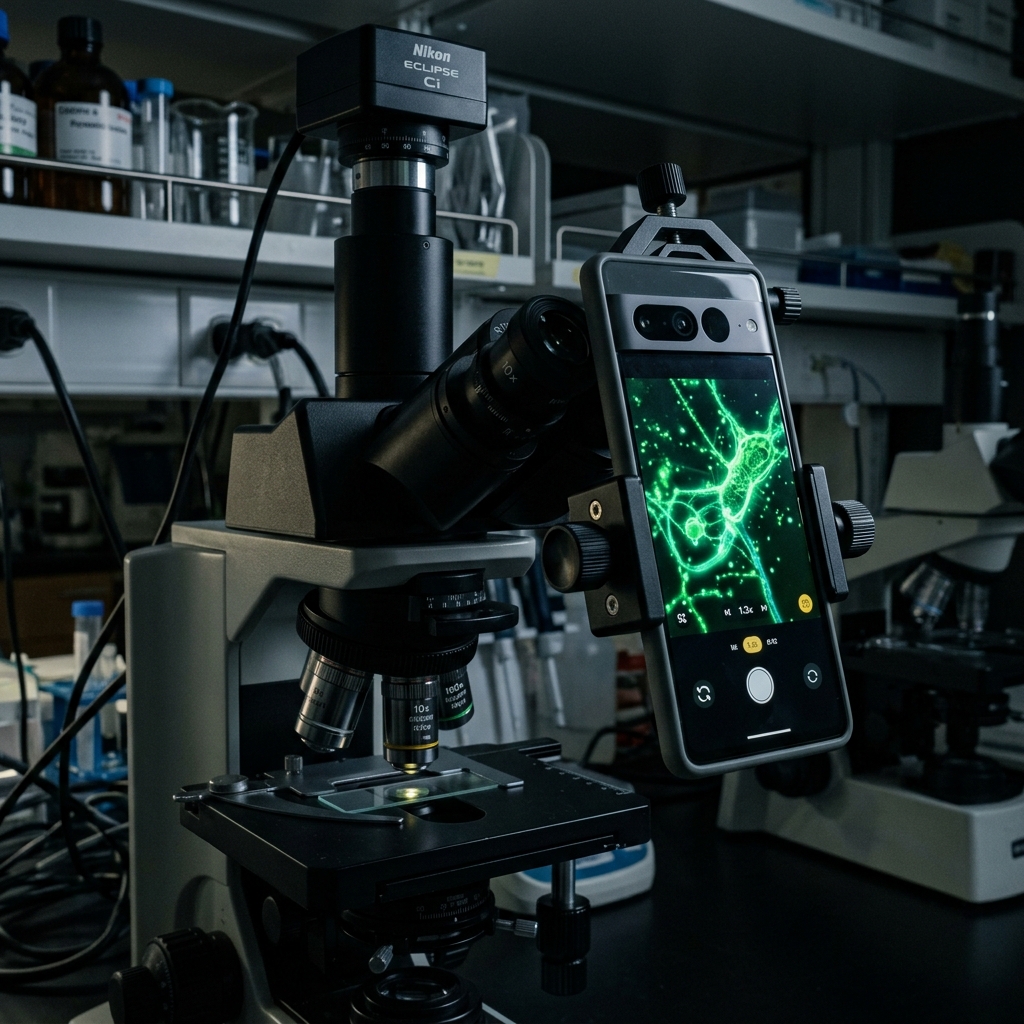
 Figure 1: Physical clamp configuration aligning the optical axis (optical center) of the microscope with the center of the phone's camera sensor (*Image is for illustrative purposes only)
[!NOTE] *All microorganism images used in this article are 3D CG illustrative images.
🎯 Quick Summary & FAQ (Conclusion First)
Before we dive into the detailed guide, here are answers to the most common questions:
Q. Why do I see a black circular frame (vignetting) when I hold my phone up to the eyepiece? A. It is because the light bundle emerging from the eyepiece (the exit pupil) is misaligned with the optical axis of your smartphone’s camera lens. By using a physical adapter to lock the optical axis in alignment, and zooming the camera screen by 1.2x to 1.8x, you can push the black vignetting frame out of view and display a clean, full-screen microscopic image.
Q. I am worried about the lenses touching and scratching each other. A. You can easily prevent this with our “DIY Cushioning Method”! Cut a donut shape out of sponge tape or an EVA foam sheet (from a dollar store) and stick it around your phone’s camera lens or the adapter’s mounting interface. This completely blocks direct glass-on-glass contact while acting as a light-shielding seal.
1. Why Does Vignetting (Dark Corners) Occur?
Both the smartphone camera lens and the microscope eyepiece have their own designed light paths (optical axes).
If you try to shoot freehand, even a millimeter of offset between these two axes will block light from properly reaching the smartphone’s sensor, causing the circular dark framing known as “vignetting” (peripheral light reduction). Below, we explain the physical alignment and exposure control needed to eliminate this completely.
2. Optical Axis Alignment: Misaligned vs. Aligned
Let’s look at how the light paths get blocked when misaligned, and how they project perfectly onto the sensor when aligned.
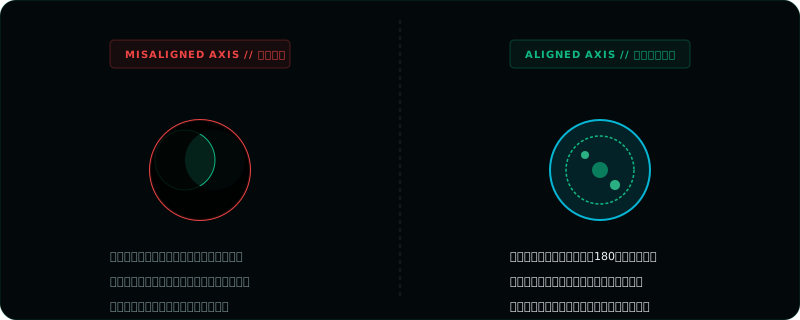 Figure 2: The difference between a misaligned axis (left: leaving a dark circular frame) and a perfectly aligned axis (right: zero vignetting with Volvox beautifully resolved across the entire frame)
3. Three Optical Axis Hacks for Mastering Smartphone Microscopy
Hack 1: Rigid Mount (Physical Clamp) & Lens Protection Cushioning
Never shoot freehand, as it is impossible to prevent axis shake. Use a dedicated “smartphone microscope adapter” that clamps securely onto the eyepiece. For selection tips, see “Selecting and Aligning Smartphone Adapters”.
[!TIP] Defend Against Scratches with the DIY Cushioning Method! To prevent metal adapters or clamps from scratching your smartphone glass or lens, cut a 15mm circle out of a dollar-store urethane sheet or thick cushion tape, punch a hole in the center for the camera lens, and apply it to the adapter’s contact surface. This blocks scratches completely and works as a shading hood to shut out ambient light leaks (stray light).
Hack 2: Crop Out Vignetting via Optical/Digital Zoom
Even when the optical axis is perfectly aligned with a physical mount, you will still see a faint, dark circular border around the frame. This is normal and caused by the mismatch between the microscope’s circular field of view and the smartphone sensor’s rectangular aspect ratio. Simply pinch the screen to apply a “1.5x to 2.0x digital (or optical) zoom.” This crops the dark border out, filling your screen with a bright micro-image.
Hack 3: Lock Focus and Exposure (AE/AF Lock) to Prevent Overexposure
Because microscope LED light sources are highly concentrated, your smartphone’s auto-exposure algorithm will often go haywire, blowing out the center of the image into pure white. To fix this, long-press the subject on your screen to activate “AE/AF Lock.” Then, slide the exposure adjustment slider down to lock the exposure slightly dark (underexposed). This brings out the fine details of transparent cell walls, flagella, and cilia.
4. Go Professional: “Incident Lighting & DIY Darkfield Hacks”
Standard microscopes rely on “brightfield illumination” where light shines straight up from the bottom, causing the background to appear solid white and washing out transparent microorganisms. Here are two hacks to dramatically improve your results:
1. Simple Darkfield Lighting using a Black patch
Cut a circle of black construction paper (approx. 8mm–12mm in diameter) to create a “light-stop patch,” and place it in the center of the lower light source (or condenser lens cover). This blocks direct rays from entering the lens. Only the oblique rays reflected from the edges illuminate the subject. The result is a professional-looking, ethereal photo where “the organism’s contours glow in neon green or cyan against a pitch-black background (darkfield illumination)” which is a professional-grade fantasy macro photo.
2. Incident LED Lighting Hack (Top / Side Lighting)
When observing opaque subjects (like water bears or moss), relying only on transmitted light from below leaves them as dark silhouettes. To reveal their textures, combine it with an “Incident LED Lighting Hack” by shining your phone’s camera flash or a small USB LED ring light from an angle above. This projects realistic 3D textures and surface details onto your phone. For gear details, see “Bring Out the Details! High-Brightness LED Ring Lights & DIY Lighting Secrets”.
🔗 Related Articles
- 👉 Microscope Selection Guide for Beginners: How to Choose Without Failing & Recommended Models for Smartphone Photography
- 👉 Finding Tardigrades in Balcony Moss: The Ultimate Guide to Rearing and Observation
- 👉 Culturing Volvox: Rearing the Green Spaceship and Observing Asexual Reproduction
- 👉 Selecting and Aligning Smartphone Adapters
- 👉 Bring Out the Details! High-Brightness LED Ring Lights & DIY Lighting Secrets
![[The Origin of Superfoods] Spirulina Culturing & Microscope Observation | How to Make Baking Soda Culture Water to Grow Spiral Cells](/images/spirulina.png)
![[The Giant Micro-Trumpet] Collecting the Glowing Blue Giant Single-Celled Stentor and Tips for Water Quality Maintenance](/images/stentor.png)